|
One or more samples can be recorded for each sample set. So a parent Sample-Set can have one or more child Samples.
(More details on Sample-Set Definition and its use is given here.)
In turn, each Sample can have one or more Analytical Results, one for each chemical agent, or analyte for which the Sample has been analysed.
The Sample Type (ie the sample is of Personal Inhalation type; or Personal Dermal type or Static Inhalation type) is determined, or inherited from, the parent Sample-Set type
The Sample and Results form is opened from the Sample-Set form by clicking on the button Samples & Analytical Results For This Sample Set.
There are two versions of the Samples Results form - one for inhalation sample type, and one for dermal sample type. The one theat will be is dictated by the parent Sample-Set type.
The principles of using the two Sample type forms are the same, although the Dermal Sample Results Form contains some additional fields for dermal parameters. The two types of Sample Results Form are described separately in sections below.
Inhalation Sample results form data-entry
Dermal Sample results form data-entry
Selecting and Adding Chemical Agents / Analytes
Return to top
Inhalation Sample Results
A screen-shot of the Inhalation Type Sample Results form is shown below.
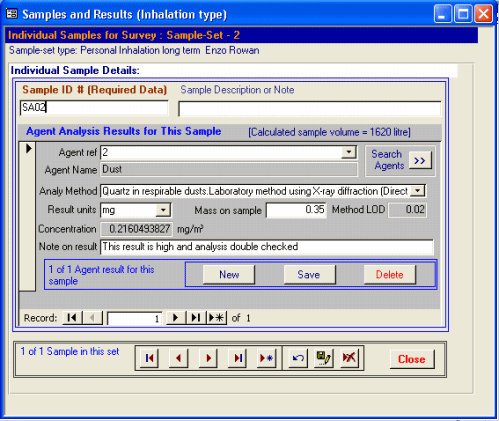
Data entry begins by identifying and entering sample data at the top of the form, then adding one or more results data into the inner results area, that is shaded a darker grey. Note that one or more Results records can be added for each Sample.
Samples can be edited or added using the common CEMAS navigation bar at the bottom of the screen. Multiple samples can be added for each Sample-Set. The current number of Samples in the current Sample-Set is displayed in the standard navigation bar at the foot of the screen.
A Sample ID (a relevant reference code or number, or similar unique identifier) must be added as the first field on the form. This number must be unique within a Survey. The Sample ID can be supplemented with a description or note in the adjacent note field.
After a Sample record is created by adding the Sample ID, then Analysis Results, can be added to the inner Results form.
Analysis Result data is nested inside the outer parent Sample Form. The Result record area is shown with the darker grey background. One or more Results can be added for each Sample. Multiple Results can be navigated using the standard record navigation bar buttons. the New, Save and Delete buttons can also be used.
Note that for Inhalation type samples, the calculated volume of the sample (duration * mean sampling rate) has been carried across from the parent Sample-Set data record to which this Sample belongs.
A chemical agent or analyte must be specified for each result record. The chemical agent or analyte can be selected in two ways : by using the drop-down box to present a list of possible agents, or by searching the Agent list via the Search Agents >> button on the Sample result form. This search method is further described here.
Having specified an analytical agent an analytical method must be chosen. This is selected from those specified earlier in the Survey Definition stage of data entry (as described here).
The actual analytical result should then be entered in the Result field, and the units of the result specified. Currently CEMAS allows the entry of milligrammes or the number of fibres, to be specified as units. This may be augmented in future versions to allow the entry of parts-per-million (ppm) result units.
The Results form uses the result, and earlier calculated sample volume (coming from the parent Sample-Set record) to calculate the concentration for this agent. If the result is below the limits of detection for the analytical method specified, this will be indicated and a standard method, that substitutes the result with (0.5 * method-limit-of-detection) is used to derive a calculated concentration.
A sampling rate and sample duration need to be specified at the Sample-Set level, in order for a sample volume and concentration to be calculated.Likewise, if no analytical method or no limits of detection are specified, the calculation cannot be completed.
A note can be added to the result in the final field on the form as required.
to top
Dermal Sample Results
The method for entering Dermal Sample and results data is similar Inhalation results above, but involves the addition of three additional fields for each Sample record.
An illustration of the Dermal Sample form is shown below.
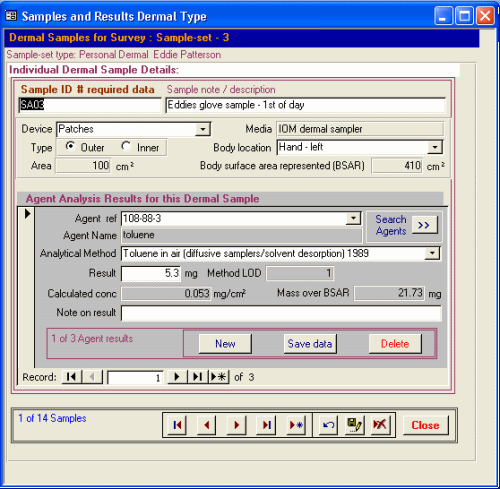
Samples can be edited or added using the common navigation bar at the bottom of the screen. Multiple samples can be added for each Sample-Set. The current number of Samples per Set is displayed in the standard navigation bar at the foot of the screen.
A Sample ID (a relevant reference code or number number, or similar unique identifier)must be added as the the first field on the form. This number must be unique within a survey.
Adding the Sample ID creates a new Sample record and then allows other sample and individual Results data to be added . The Sample ID can be supplemented with a description or note in the adjacent field.
From the first drop-down box a dermal sampling device must be chosen from those that were specified in the parent Sample-Set. The area of the sampler will be displayed. Choose whether this is an inner or outer type device.
Select the appropriate body location for the sampling device. The body surface area represented by this location will be displayed.
After a Dermal Sample record is created by adding the Sample ID and Sampling device details, then the agent Analysis Result, or Results, can be added.
Result records are nested inside the outer parent Sample Form. The Result record area is shown with the darker grey background. One or more Results can be added for each Sample. Multiple Results can be navigated using the standard record navigation bar buttons. the New, Save and Delete buttons can also be used.
A chemical agent or analyte for the result must be specified. The chemical agent or analyte for the result can be selected in two ways : by using the drop-down box, or by searching the Agent list via the Search Agents >> button on the Sample result form.as further described here.
Having specified an analytical agent an analytical method must be chosen. This is selected from those specified earlier in the Survey Definition stages (as described here).
The analytical result should then be entered in the Result field. Dermal samples are entered as mg.
The Results form uses the result, and the sampler area to calculate the concentration as mg/cm2. Using the body surface area represented by the sample, the mass over Body Surface Area Represented (BSAR)can also be calculated.
If the result is below the limits of detection for the analytical method specified, then currently a standard method, that substitutes the result with (0.5 * method-limit-of-detection)is used to derive a calculated concentration.
A note can be added to the result in the final field on the form as required.
Further Samples and Analytical results can then be added for the current Sample-Set.
to top
Choosing or adding analytical agents/analytes
From the search results form, as shown below, an analyte can be selected by double-clicking on the Agent/CAS ID. and the details will be pasted into the sample results form.
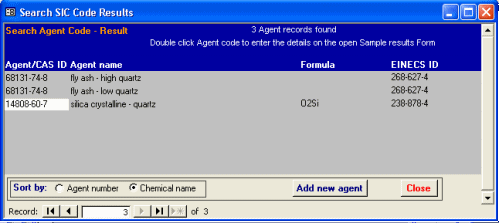
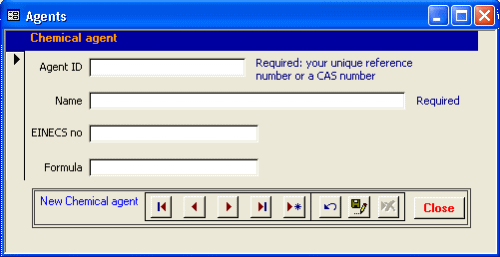
The agent list contains numerous known Chemical agents with their name and, where available, their CAS (Chemical Abstract Service) number, their EINECS number, and formula. It is also possible to add new analytes to the Agent list by clicking the Add new agent button as shown below.
to top
|